Base de Conhecimento
Configuring a network bridge Imprimir este Artigo
Objective
Bridged networking can be used to configure your virtual machines. Some tweaking is necessary to make the network configuration work on our network.
This guide will explain how to use network bridging to configure internet access for your virtual machines.
Requirements
- a dedicated server with a hypervisor installed (e.g. VMware ESXi, Citrix Xen Server, Proxmox, etc.)
- at least one failover IP address attached to the server
- access to the OVHcloud Control Panel
Instructions
The basic steps are always the same, independent of the underlying system:
- creating a virtual MAC address for a failover IP
- setting the MAC of the VM to that new virtual MAC address
- configuring the IP address, netmask, gateway and route to the gateway inside the VM
Code samples in the following instructions have to be replaced with your own values:
- SERVER_IP = The main IP address of your server
- FAILOVER_IP = The address of your failover IP
- GATEWAY_IP = The address of your default gateway
Step 1: Assign a virtual MAC address
Log in to the OVHcloud Control Panel and switch to the Bare Metal Cloud section. Then click on IP in the menu on the left-hand side and locate your failover IP address in the table.

Click on ... in the relevant row to open the context menu, and select Add a virtual MAC.

Choose ovh from the “Type” drop-down menu unless you are using VMware ESXi - in that case choose vmware. Type a name in the “Name of virtual machine” field, and click on Confirm.

Step 2: Determine the gateway address
To configure your virtual machines for internet access, you will need to know the gateway of your host machine (i.e. your dedicated server). The gateway IP address is made up of the first three octets of your server’s main IP address, with 254 as the last octet. For example, if your server’s main IP address was:
- 169.254.10.20
Your gateway address would therefore be:
- 169.254.10.254
Step 3: Prepare the host
For all operating systems and distributions, you must configure your virtual machine with the virtual MAC address you have created in the OVHcloud Control Panel.
Proxmox
After creating the VM and while it is still powered off, right-click the VM and click Edit settings.
1. Select the VM.
2. Open the Hardware section.
3. Select Network Device.
4. Click the Edit button.
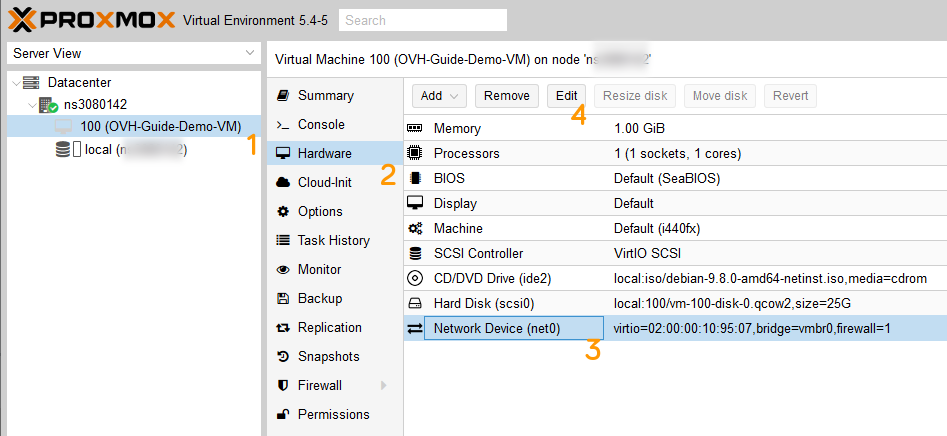
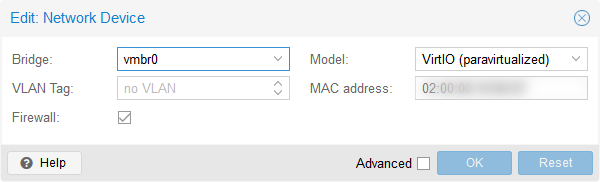
Then add the vMAC address created previously.
Now you can start the VM and proceed with the configuration steps, depending on the operating system installed.
VMware ESXi
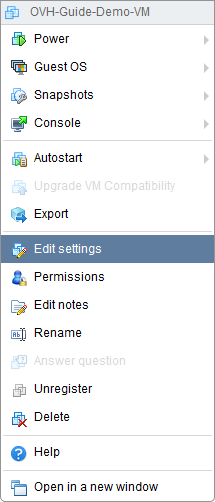
After creating the VM and while it is still powered off, right-click the VM and click Edit settings.
Fold out Netwok Adapter 1, change the value in the MAC Address drop-down menu to Manual and enter the MAC address created previously.
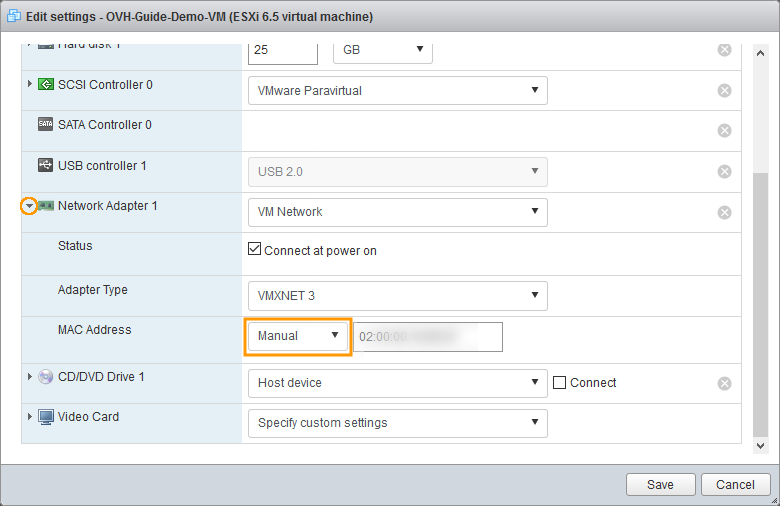
Now you can start the VM and proceed with the configuration steps, depending on the operating system installed.
Step 4: Configure the virtual machines
Debian
Connect to the shell of your virtual machine. Open the virtual machine’s network configuration file located in /etc/network/interfaces. Edit the file so that it reflects the configuration below (please remember to fill in your own values).
- For older distributions:
auto lo eth0
iface lo inet loopback
iface eth0 inet static
    address FAILOVER_IP
    netmask 255.255.255.255
    broadcast FAILOVER_IP
    post-up route add GATEWAY_IP dev eth0
    post-up route add default gw GATEWAY_IP
    pre-down route del GATEWAY_IP dev eth0
    pre-down route del default gw GATEWAY_IP
- For the latest distributions:
auto lo eth0
iface lo inet loopback
iface eth0 inet static
    address FAILOVER_IP
    netmask 255.255.255.255
    broadcast FAILOVER_IP
    post-up ip route add GATEWAY_IP dev eth0
    post-up ip route add default via GATEWAY_IP
    pre-down ip route del GATEWAY_IP dev eth0
    pre-down ip route del default via GATEWAY_IP
Also replace eth0 if your system uses Predictible Network Interface Names. You can find the network interface names with the following command:
ls /sys/class/net
Save and close the file, then restart your network or reboot the virtual machine.
Red Hat and Red Hat-based operating systems (CentOS 6, Scientific Linux, ClearOS, etc.)
Open a terminal on your virtual machine. Open the virtual machine’s network configuration file located in /etc/network/interfaces. Edit the file so that it reflects the configuration below (please remember to fill in your own values).
DEVICE=eth0
BOOTPROTO=none
ONBOOT=yes
USERCTL=no
IPV6INIT=no
PEERDNS=yes
TYPE=Ethernet
NETMASK=255.255.255.255
IPADDR=FAILOVER_IP
GATEWAY=GATEWAY_IP
ARP=yes
HWADDR=MY:VI:RT:UA:LM:AC
Save and close the file.
Next, open the virtual machine’s routing file, which is located in /etc/sysconfig/network-scripts/route-eth0. Edit the file so that it reflects the configuration below (please remember to fill in your own values).
GATEWAY_IP dev eth0
default via GATEWAY_IP dev eth0
Save and close the file, then reboot your virtual machine.
CentOS 7
For CentOS 7, the name of the network adapter will vary, depending on the installation options. You will need to verify the adapter name and use it to configure your virtual machine. You can find the Network interface names with the command ls /sys/class/net.
Open a terminal on your virtual machine. Open the virtual machine’s network configuration file located in /etc/sysconfig/network-scripts/ifcfg-(interface-name). Edit the file so that it reflects the configuration below (please remember to fill in your own values).
DEVICE=(interface-name)
BOOTPROTO=none
ONBOOT=yes
USERCTL=no
IPV6INIT=no
PEERDNS=yes
TYPE=Ethernet
NETMASK=255.255.255.255
IPADDR=FAILOVER_IP
GATEWAY=GATEWAY_IP
ARP=yes
HWADDR=MY:VI:RT:UA:LM:AC
Save and close the file.
Next, open the virtual machine’s routing file, which is located in /etc/sysconfig/network-scripts/route-(interface-name). Edit the file so that it reflects the configuration below (please remember to fill in your own values).
GATEWAY_IP - 169.254.10.254 (interface-name)
NETWORK_GW_VM - 255.255.255.0 (interface-name)
default GATEWAY_IP
Save and close the file.
Next, open the virtual machine’s DNS configuration file, which is located in /etc/resolv.conf and add this line:
nameserver 213.186.33.99
After saving and closing the file, restart your network or reboot the VM.
FreeBSD 12.0
Open a terminal on your virtual machine. Open the virtual machine’s network configuration file located in /etc/rc.conf. Edit the file so that it reflects the configuration below (please remember to fill in your own values). In this example, the interface name is em0. Replace this value if it does not apply.
ifconfig_em0="inet FAILOVER_IP netmask 255.255.255.255 broadcast FAILOVER_IP"
static_routes="net1 net2"
route_net1="-net GATEWAY_IP/32 -interface em0"
route_net2="default GATEWAY_IP"
Save and close the file.
Next, edit or create the file /etc/resolv.conf and add this line.
nameserver 213.186.33.99
Save and close the file, then reboot your virtual machine.
Ubuntu 18.04
First, open a terminal on your virtual machine and open the network configuration file located in /etc/netplan/ with the following command. For demonstration purposes, our file is called 50-cloud-init.yaml.
# nano /etc/netplan/50-cloud-init.yaml
Once the file is open for editing, amend it with the following code:
network:
ethernets:
(interface-name):
addresses:
- FAILOVER_IP/32
nameservers:
addresses:
- 213.186.33.99
search: []
optional: true
routes:
- to: 0.0.0.0/0
via: GATEWAY_IP
on-link:
Esta resposta lhe foi útil?
Veja também
Gerenciamento Básico (Grátis!) Inclui monitoramento básico do servidor e suporte a emergências...
Mudando a Senha no Windows 2003(esta operação segue a mesma lógica para o Windows 2008)...
Para isso, seu servidor precisará ter pelo menos 2 IPs. Resumo do passo a passo: 1) Anote os...
Como acessar servidores Windows via Área de Trabalho Remota =============================...
Virtual Private Server é um servidor físico particionado em vários "servidores virtuais" isolados...